10/8/12, program to make stepper motor rotate

Update: Gio and I have discussed using the converted ATX power supply I built. Note to self: Document the voltages on the power supply if I build another one. We are unable to test and verify what we think the voltages are because we don’t have sufficient materials (We need one additional banana clip).

—————————————————————————————————-
The ArduMoto becomes hot whenever this program is run on it. This could be because the shield+motor are being powered by a 12v, 1 amp  power supply. The motor takes a 3v, 2 amp power supply. Reference: http://dlnmh9ip6v2uc.cloudfront.net/datasheets/Robotics/57BYGH420.PDF
The following is code that makes the stepper motor rotate through one full revolution:

// BLUE - Pin 3
// RED - Pin 4
// BLACK - Pin 2 ** RESISTER 10W8R2J
// GREEN - Pin 1

#include
const int stepsPerRevolution = 200; // Stepper has 200 revolutions
Stepper myStepper(stepsPerRevolution, 3,13,11,12); // See reference for ARDUMOTO- use pins 3,11,12,13

void setup() {
myStepper.setSpeed(20); // set the speed at 70 rpm:
// 70 is a nice fluid move 60-70 rpm, and a nice slow rotation could be 20
}

void loop() {
myStepper.step(stepsPerRevolution); // Do a full revolution, 400 steps
delay(1000);
}

————————————————————————————————————-

Anything larger than 40 rpms starts to cause jerky movement. This may be due to the power supply. Gio and I decided to not use the power supply and to just use the power coming off of the USB and going into the arduino. It allowed for smoother movement of the motor.

When we increase the RPMs of the motor, it does become a little jerkier, and starts to rotate less and less fully (as in less than 360 degrees). This is easily fixed manually, but is still inconvenient.
10/5/12 cont.

Here is the video of the stepper motor going one full step.

10/5/12

Finally got my computer to communicate with the Arduino! After re-installing the OS and updating all the dependencies of course.. Have to use sudo ./arduino to be able to communicate with the board. Trying to figure out a way around this so I don’t have to do it every time. More to come at the end of the day.

Got the stepper motor to complete one full rotation. I captured it on video and will post the video later. Tyler and I switched from the easy driver to the ArduMoto (which is meant specifically for DC motors but can be used to drive stepper motors.

9/21 and 9/28

On 9/21 I wrote a program with the help of another program Gio found to control the rotation speed and direction of the DC motor.
I thought it might be useful (if only for archival purposes) to put the code here.

//DC Motor Code
//variables
int y=1;
int x=1;

//program
void setup() {

//Setup Channel A
pinMode(12, OUTPUT); //Initiates Motor Channel A pin
pinMode(9, OUTPUT); //Initiates Brake Channel A pin

}

void loop(){
digitalWrite(12, HIGH); //Establishes forward direction of Channel A
digitalWrite(9, LOW); //Disengage the brake for Channel A
analogWrite(3,64); //Spin motor on A at low speed
delay(700);
analogWrite(3,255); //Spin motor on A at full speed
delay(700);
analogWrite(3,0); //Do not spin motor on A
delay(300);
digitalWrite(12, LOW); //Establishes backward direction of Channel A
analogWrite(3, 123); //Spins the motor on Channel A at half speed

}

9/28/12
I still can’t get my laptop to interface with the Arduino, hopefully I can resolve this issue by the end of the day.

9/11-12/12, Volume in the PVC pipe

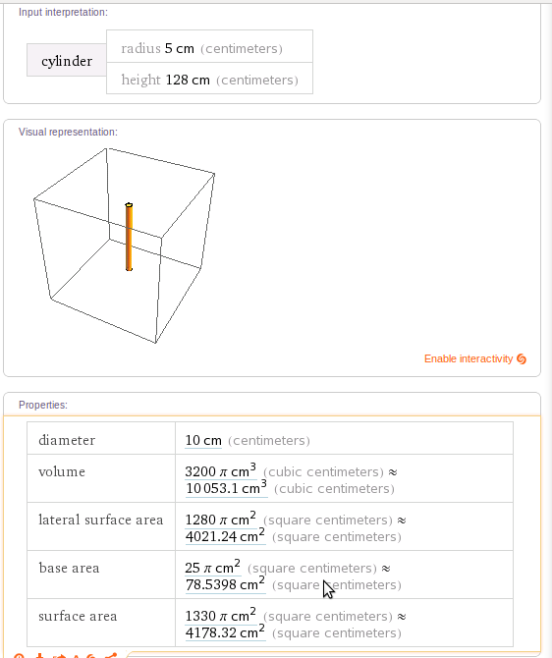
I went ahead and calculated the height required to have an internal volume of 10 L in the PVC pipe.
Prerequisites for calculations:

The PVC pipe had an internal diameter of 100mm=10cm, which makes the radius 5cm
\pi r^{2}h=V_{cylinder}
1 cm^{3} = 1 L
1 L = 1,000 mL \therefore 10 L = 10,000 mL = 10,000 cm^{3}

We have
10,000 cm^{3}=\pi (5 cm)^{2}h
\frac{10,000cm^{3}}{25cm^{2}\pi} = h
128cm \approx h
Wolfram alpha verified my math Image
http://www.wolframalpha.com/input/?i=cylinder%2C+radius%3D5+cm%2C+height%3D128+cm

Andy raised some concern about how much space it takes to really create a 10L vacuum, so far I have not found any information on this. If anyone has found anything out, please let me know so I can redo the calculation.

8/25/12

Finished taking moisture data. It is all updated in the spreadsheet. There was one sample point that was strange, because I was forced to use a very small amount of lactose. The moisture content in it was extremely high compared to the range I was expecting.

8/21/12

Taking more moisture data today. There was one sample I analyzed that had a weight of around 0.3 g. It was the Anhydrous lactose. It had a moisture content of 2.8% which is much higher than was expected. This may have to do with the small sample size.

8/16/12

Took more moisture data today. There does actually appear to be a difference between the two different Pharmatose powders. Pharmatose 125M had values of 1.82% and 1.66%, while Pharmatose 450 M (the powder that has been sticking to itself) had values of 3.1%, 3.5% and 3.6%. Interestingly enough, Supertab 11SD had values of 3.18%, 3.03%, and 3.16%. However, this powder did not have issues of sticking to itself.

8/15/12

Still gathering data on powder moisture content. As of right now, there does not seem to be much of a difference in moisture content between the different sizes of Pharmatose. The anhydrous lactose has lower moisture content (as is expected).
Unfortunately, I forgot to write down the temperature we were conducting these tests at, and data will have to be regathered. However, not much data had already been taken. For future reference, I am using the temperature of 115 degrees Celsius for a time of 15 minutes total.

Lactose powder moisture content

Today, I am gathering data on the moisture content of the lactose powders. We suspect that one of our powders is behaving differently from the others due to a higher moisture content. The particle is sticking to itself and not flowing freely.
This is done by taking a sample of the powder and placing it in a moisture balance. The moisture balance heats the sample above the boiling point of water, and compares the weights of the sample before and after the heating process is completed.

https://docs.google.com/a/utexas.edu/spreadsheet/ccc?key=0AuctW4du0OUGdE9nSmN6S2o2VFV4b1JWM3JQdG41SFE